Table of contents
As you know, a very important thing when running Facebook ad campaigns is having a pixel with properly configured events. However, custom conversions and events are equally important. How to use them, and most importantly, how to implement them? You’ll learn all this in today’s article.

What are custom conversions?
Facebook’s advertising platform has quite a list of events that can be defined as conversions. They can be, for example, all clicks, filling out a form or making a purchase. However, it is known that every business is different and may have a completely different set of guidelines for when a conversion occurs. For this reason, Facebook has given advertisers the ability to let advertisers themselves determine what actions on their site will be conversions.
Custom conversions are created using rules for events. Among their biggest advantages, we can include:
Custom conversions are the following.
- Filtering events — you can, for example, create a rule to measure the number of users who purchased products in a certain colour or at a certain price
- Configure standard events without additional code — you only need to have the basic meta-pixel code implemented
- Precisely measure the effectiveness of campaigns so you can optimize them more effectively.
- Control the data shared with partners — you can share individual custom conversions instead of the entire data source
It is worth remembering that one advertising account can have a maximum of 100 custom conversions. If you reach this limit and need to implement another one, you can remove them at will.
Before removing a custom conversion, remember to change the ad set optimization options. Ad sets optimized for a custom conversion that no longer exists will still be displayed, but they may get poor results because no custom conversion will be matched to them.
In addition to deletion, automatic archiving of custom conversions is also available if they are inactive or Facebook does not receive data about them within 2 years. Archiving a custom conversion means deleting it from the Event Manager. However, after that, you can still view reports from previous campaigns for that archived custom conversion in the Ads Manager. To restore an automatically archived conversion, you must create a new custom conversion with the same rules.
How to configure custom conversions?
To configure custom conversions, you don’t need to implement any additional code on your website. However, you need to have the base code of the pixel with the page display event on your site.
Next, you need to go to the Event Manager on your Facebook Ads account. Next, in the drop-down menu on the left, select „Custom Conversions.” Click the „Create a custom conversion” button. At this point, you will see the following window:
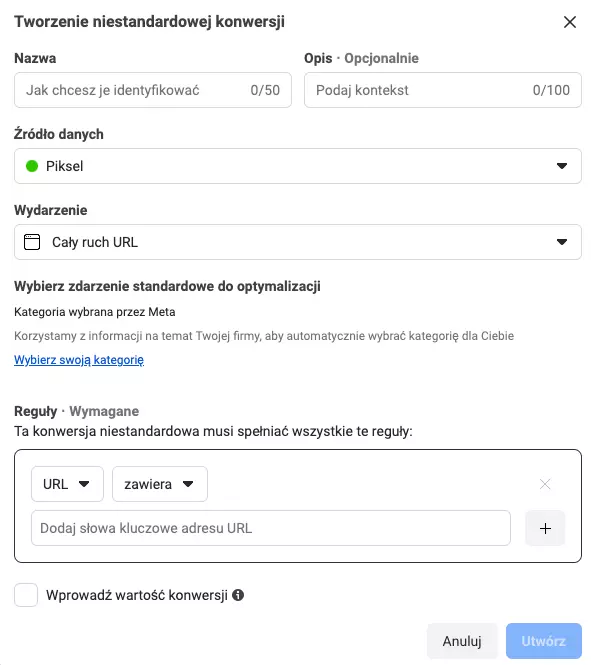
The first step is to name your conversion. Optionally, you can also use the description field. Next, you choose the data source of the conversion. The most common is Pixel (make sure you choose the right one), but you also have the option to choose an offline event or an application.
When creating a custom conversion, be sure to indicate the conversion event. You can choose between standard events, custom events, and all URL traffic. We will now discuss each of the options.
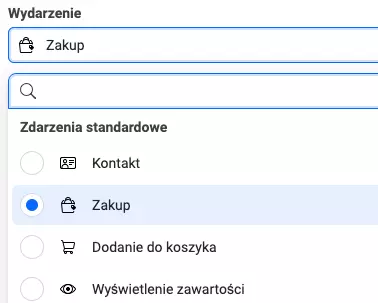
Standard Events
The list of available standard events depends on what Facebook finds on your site. For example, let’s now choose „Purchase.”
The next step is to create a rule. When specifying the conversion parameters, you have the option of choosing from URL, Referring Domain, or Event Parameters.

We use the URL when we have a unique purchase confirmation page. By choosing Referring Domain, you can track how much of your sales come from referring domains such as Google search. Event Parameters, however, will be a good option if you don’t have unique purchase confirmation pages for each product.
Further, in the second drop-down menu, choose from the options: includes, does not include or equals to filter events for more specific actions.
- If you select contains or doesn’t contain, type a portion of the URL in the text box that corresponds to the custom conversion, such as /thank-you-page
- If you choose URL equals, copy and paste the exact URL corresponding to the custom conversion into the text box. Include the full domain along with the string „https://www”.
To maximize the ability to monitor custom conversions accurately, it is recommended that you use the URL contains option and paste the smallest possible portion of the URL required to distinguish a specific page from other pages on your website.
If you want to add more rules, you can do so by clicking on the + sign.
Optionally, at the very end, you can check the box next to the item “Enter conversion value” and then enter a value. Use this field in a situation where the events within the custom conversion do not have a conversion value.
Custom events
If you use custom events on your site, it is essential to create custom conversions. This is the only way to measure these events and optimize your campaigns.
Initially, you must select the appropriate event by clicking „Select your category.” The next step, as before, is to create a rule.
All URL traffic
The last option for creating custom conversions is all traffic from URLs. These are defined by URL, referring domain or UTM parameters. A URL-based conversion will work well for tracking confirmation pages, such as a subpage confirming a contact form submission. For URL-based custom conversions, keep in mind that the page must contain a pixel base code with a page display event.
The final step, analogous to the rest of the cases, is to create a rule.
In each of the above options, after creating a custom conversion, you can change its name, description and value. Keep in mind, however, that changing the value of a custom conversion will affect the data in the advertising reports, because subsequent conversions will be assigned to the changed value, not the original value. However, you cannot change the rules for a custom conversion — if you need to adjust it, you must create a new conversion.
Testing a created custom conversion
Before we start optimizing our campaigns for the custom conversion we’ve created, it’s a good idea to first test that it’s working properly. To do this, go to the Event Manager and then select „Data Sources” from the menu on the left. Then, click on the „Event Testing” tab in the middle of the page. In the empty window, type the address of the site you are testing and click „Open Site.” Your website should open in a new tab or a separate window.
Then perform the action under which the event is attached and return to the Event Testing tab. The Event Testing tab should fire up the conversion you previously configured. The test information will remain visible for 24 hours or until you delete it.
What if you don’t receive activity information?
- Make sure you have all ad blockers turned off
- Check that the pixel is installed on your site
- When interacting with the site, remember that the Event Testing page must be open
- Refresh the site and retry the interaction
If you have followed the above advice and still no event appears, you most likely made a mistake when configuring the custom conversion and need to try creating it again.
How to optimize campaigns for custom conversions?
The most important advantage of custom conversions is the ability to optimize campaigns for them. We can do this at the ad set level.
When creating a new ad set, we select the conversion event location „Website” and the corresponding Pixel. Then, we choose from a list of standard events and custom conversions. We can distinguish custom conversions because when we hover over them with the mouse cursor, the applied rules are shown next to them.
Ultimately, it is worth ensuring we optimize our ads for conversions in the „Optimization and Display” section.
How to measure custom conversions?
If we optimize our campaigns for a specific conversion event, Facebook reports the number of conversions to us in the „Results” column. However, if you also want to track other conversions that the ad set is not optimized for, you can do so by customizing the columns.
Click from the Columns menu and then „Customize Columns” at the bottom. From the menu on the left, select „Custom Conversions.” There you will find all the conversions you have created. Select the one you want to track by highlighting it. You can also add columns for individual parameters.
If you want to see all the conversions a given set of ads has generated, you can also hover over the number of conversions in the „Results” column.
Summary
Using custom conversions brings many advantages. They allow you to measure conversions in reports at the Ad Manager level accurately. They will also indicate to you how many and what kind of conversions are generated by individual campaigns, ad sets and the ads themselves. What’s more, you can also create groups of similar audiences based on users who have already made a given conversion and use these groups for exclusions in campaigns.
Although creating custom conversions seems to be a rather complicated procedure, you should have almost no problem with it after a few attempts. However, if you are not sure how to create in-house and implement custom conversions, you can always enlist the help of a marketing agency
Was the article helpful?
Rate our article, it means a lot to us!
Let's talk!

She has been involved in internet marketing for two years, but despite her relatively short presence in the industry, she has already conducted advertising campaigns for small and large companies, both on the Polish and foreign markets. He treats digital marketing not only as a job, but also as a passion, which is why he tries to expand his knowledge and skills every day. She joined Up&More in January 2023, where she manages projects in Facebook Ads, Google Ads and Apple Search Ads.